

If ClassFit emails are being sent to your junk folder, you may wish to whitelist ClassFit as a safe sender. Whitelisting lets your mail provider know that you want emails from this sender to go into your inbox rather than your junk folder.
How to Whitelist an Email in Gmail
If you’re using Gmail as your email provider, it’s easy to set things up so that a given sender is whitelisted for all future communications. The Gmail whitelist process can be done quickly through the web client:
- Click the settings button (in the top-right corner of the screen), then select “Settings” from the resulting drop-down menu.
- Navigate to the tab labeled “Filtered and Blocked Addresses” to access information about your existing filters.
- Select “Create a new filter” and enter the emails or domains you want to whitelist.
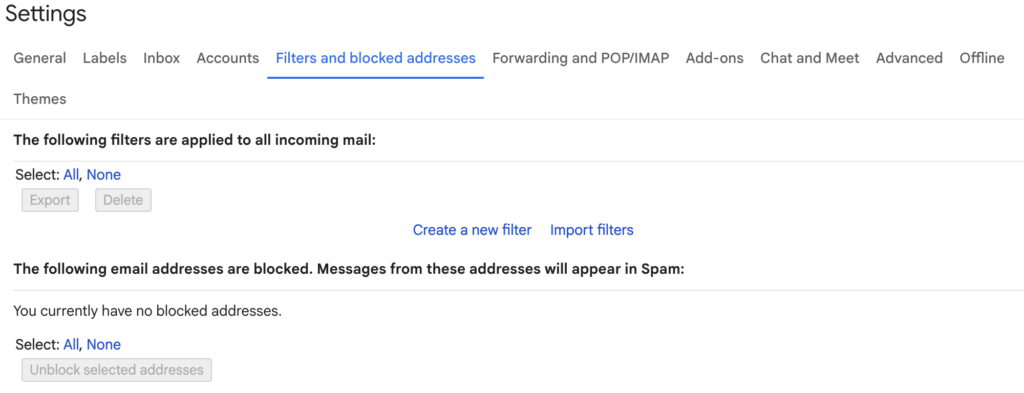
To whitelist a single email address, for example, type the entire address. On the other hand, if you’re trying to whitelist every sender from a certain domain, type the domain alone, such as “@yahoo.com”. This will tell Gmail to approve every email from a Yahoo sender.
Click “Create filter” to approve the new filter, then mark “Never send to Spam” to whitelist every email within the filter. You can also choose to Star these emails, apply a given label, or mark them as important.
How to Whitelist an Email in Outlook
Whitelisting a domain or specific email address in Outlook.com is just as easy and works by adding the address or domain in question to a group called “safe senders”. An address that has been added to safe senders will be pushed to your inbox regardless of your spam filters. To add an address or domain to safe senders:
- Click on “Settings”, then “View all Outlook settings”.
- Go to “Junk email”, then choose “Safe senders and domains” or “Safe mailing lists” to select the domain or email you want to whitelist.
- Enter the domain name or email address you wish to add to Safe senders. Make sure to include the @ character for domain names in order to only whitelist emails with the exact string of characters you entered (and nothing more).

Alternatively, you can simply add an individual email address that has sent you an email to your Outlook Contacts. Though they lead to the same result, this method is quicker and more efficient than manually entering information.
How to Whitelist an Email in Yahoo Mail
The three most effective ways to whitelist a sender or domain in Yahoo Mail are outlined below:
1. Mark as “Not Spam” (For existing emails)
If a valid email from a trusted sender landed in your Bulk or Spam folder, you can easily rescue it:
- Go to your Spam folder.
- Locate and check the box next to the email.
- Click the Not spam button at the top of the screen.
- Yahoo will automatically move the message to your inbox and learn to deliver future emails directly there.
2. Add to Contacts (For future emails)
Yahoo Mail is programmed to trust emails that come from people in your address book:
- Open an email from the sender you want to whitelist.
- Hover your mouse over the sender’s name or email address.
- Click Add to contacts in the pop-up window.
- Fill in the contact details and hit Save.
3. Create a Filter (Best for targeting whole domains)
To completely prevent emails from a specific sender or an entire domain (e.g., *@example.com) from ever going to spam, you can create a filter:
- Click the Settings icon (gear) in the top-right corner of Yahoo Mail and select More Settings.
- Go to the Filters tab in the left-hand menu and click Add new filters.
- Name the filter something memorable, like “Trusted Senders”.
- Under Set filter rules, set the drop-down to Sender, select contains, and enter the email address or domain name.
- Under Choose a folder to move to, select Inbox.
- Click Save.
How to Whitelist an Email Address in AOL
Many people looking for email whitelisting instructions for AOL are confused by the fact that AOL doesn’t have a traditional email whitelist. Instead, it considers all mail addresses a user has in his or her address book to be trustworthy. This means that the contact list in AOL essentially serves the same purpose as Gmail whitelist and Outlook whitelist.
Here are step-by-step instructions for whitelisting an email address in AOL:
- Log in to your AOL account.
- Open Contacts from the left navigation pane.
- Click the New Contact icon and enter the required information.
- Click the Add Contact button located at the bottom.
As you can see, the entire process is straightforward, and deleting existing contacts is similarly easy. All you need to do is select the contact you want to delete and click the Delete button at the top of the page. If you want to block the deleted contact, you need to go to Options -> Mail Settings -> Spam Settings. There, you can add the contact to your blacklist.
How to whitelist an email address in Hotmail
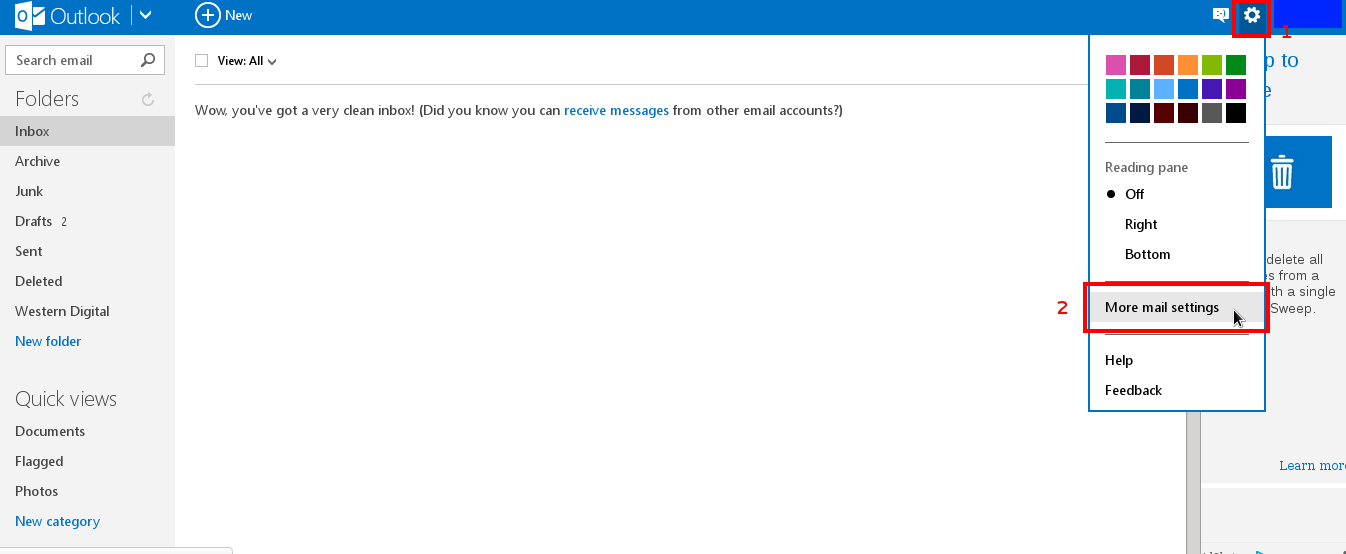
1. Login to your Hotmail, click on the Settings icon at the top right side of the page, expand it and click on More Mail Settings
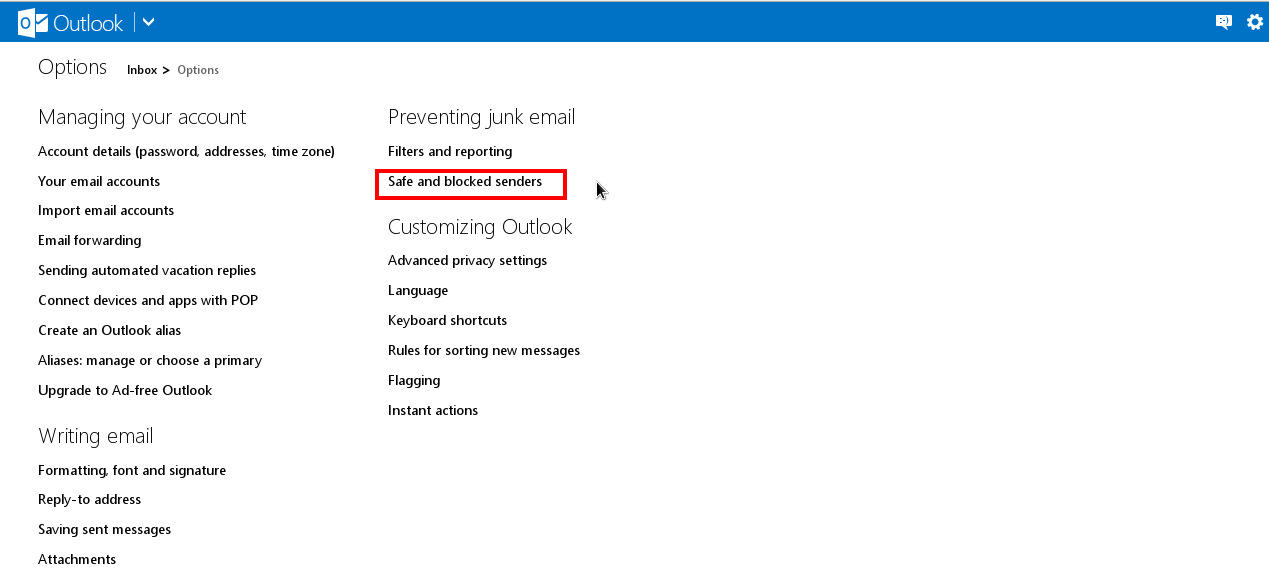
2. Click on Safe and blocked senders

4. Insert the email address you want to whitelist , then click Add to list
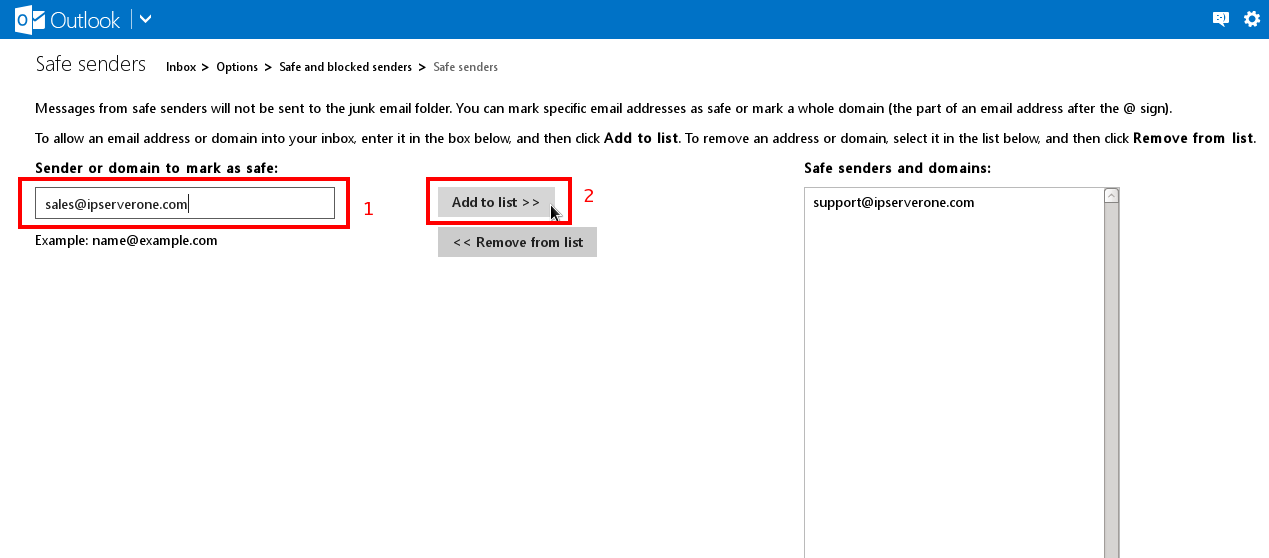
5. Email address has been whitelisted and will skip spam check by Hotmail.
Comcast/Xfinity
If you have an email account from Xfinity (formerly Comcast), here’s how to whitelist a contact:
- Sign into your My XFINITY account.
- At the top right, click the Mail icon to get to your inbox.
- Click the Address Book tab.
- Click +Create Contact in the top menu (looks like a head silhouette with a plus sign).
- Add the sender’s email address.
- Click Save to save and whitelist the contact.
Mac OS X Mail App
To whitelist all emails from a domain in the Mail app for Mac OS X or macOS:
- In the top menu, click Mail > Preferences.
- Click the Rules tab.
- Click Add Rule.
- Enter a whitelist name in the Description field, such as “Whitelist: sumo.com” to create the new rule.
- For conditions, set the first dropdown menu item to any. It should say: If any of the following conditions are met.
- In the following dropdown menus, select From in the first field and Ends with in the second field.
- In the text field following Ends with, enter the domain name that you want to whitelist. Include “@” before the domain name to make the filter specific—for example, to whitelist all mail from the sumo.com domain, but not mail that might come from one of its subdomains (such as @subdomain.sumo.com), type “@sumo.com” into the field.
- Click the plus sign next to the last condition to add another domain with the same criteria if you want to whitelist more domains.
- In the Perform the following actions section, set the three dropdown items to: Move Message, to the mailbox: Inbox (or any target folder you want).
- Click OK to save the rule.
If you need any further help with this, please email [email protected].