

Connecting to Stripe with an existing account
Once you’ve created your ClassFit account, you may want to connect to Stripe so you can take online payments. This tutorial will help you connect to Stripe with an existing account. If you don’t have an existing Stripe account, please click here for a more appropriate tutorial.
Please note – some countries such as Australia, Brazil, India, Latvia, Malaysia, Mexico, Norway, Singapore and United Arab Emirates which connect a slightly different way. If you are connecting from one of these countries, please click here for a more appropriate tutorial.
Connecting to Stripe with an existing account
Once you’ve logged into the website, click on Tools, and then Integrations (as below).
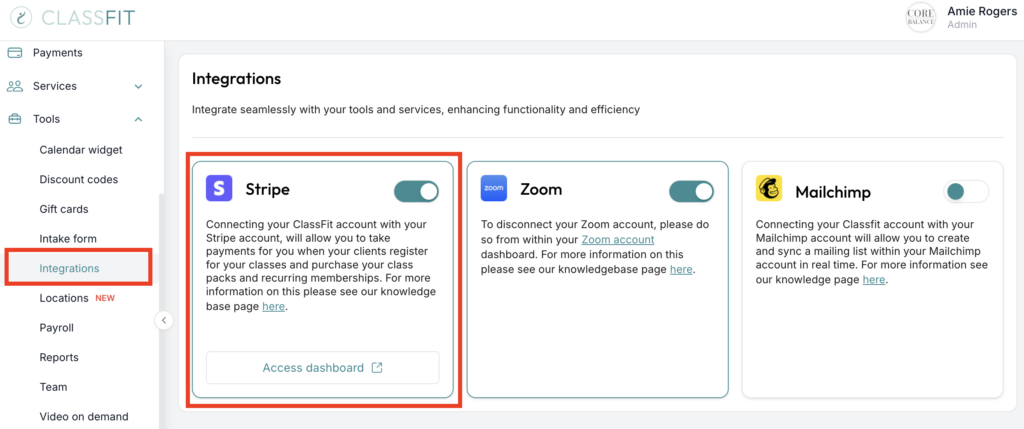
Click on the toggle button for Stripe.
Enter your mobile number and email address as below. If don’t have an existing Stripe account you can use any email here and create a Stripe account in the steps that follow.
NB. If you want to connect to a pre-existing Stripe account, please ensure you use the email address associated with your existing Stripe account. More on connecting with an existing Stripe account here.

Stripe may ask you to confirm your identity with a 2FA code sent to your mobile device (as below).

Stripe will then ask you to provide your business type (as below).

Stripe will then ask you to provide further details about you and your business, depending on your business type (as below).

Stripe will then ask you to provide a link to your website. If you don’t have a website, this could also be a link to another relevant URL such as a social media page (as below).

Stripe will then ask you to provide your bank details in order to send payments to you (as below).
Finally, Stripe will ask you to review your details before creating your account. If you’re happy your details are correct, click the Done button (as below).
Accessing your Stripe Dashboard
Now you’ve created and/or linked your Stripe account, you will likely wish to access it. To do this, go to Tools / Integrations and click Access dashboard (as below).
If it’s the first time you’re accessing your Stripe dashboard, we’ll ask you to enter a 4 digit PIN (as below). This will provide an extra layer of security for your Stripe account, and if you share your ClassFit account with multiple users, allow you to continue doing that, while limiting access to your Stripe account. Once you’ve created your PIN, you will need to enter this in the future when you access your Stripe dashboard (as below).
If you need any further help with this, please email [email protected].